| 일 | 월 | 화 | 수 | 목 | 금 | 토 |
|---|---|---|---|---|---|---|
| 1 | 2 | 3 | 4 | 5 | 6 | 7 |
| 8 | 9 | 10 | 11 | 12 | 13 | 14 |
| 15 | 16 | 17 | 18 | 19 | 20 | 21 |
| 22 | 23 | 24 | 25 | 26 | 27 | 28 |
- Linux
- hashcode
- spring-framework
- REST
- Spring Boot
- maven
- soap
- JAR
- Gradle
- mybatis
- 웹프로젝트
- Spring Framework
- oracle
- jsp
- tomcat
- War
- git
- annotaion
- 개발
- gitlab
- 스프링프레임워크
- java
- Jenkins
- Web
- Spring
- 이클립스
- SpringFramework
- Pipeline
- springboot
- 스프링부트
- Today
- Total
Verity's Daily Logs_
[Jenkins]Springboot프로젝트를 AWS에 배포하기 (Jenkins Pipeline) 본문
지난 포스팅에서 정리했듯이, Publish Over SSH 플러그인이 지원 종료되면서 Spring프로젝트를 배포할 다른 방법을 찾아봐야 했다. Jnkins Pipeline 프로젝트를 이용하여 배포하는 방법을 정리해 보도록 한다. 참고로, Jenkins Pipeline은 연속된 작업을 연결해놓은 젠킨스의 자동화된 프로세스를 표현하는 말이다.
https://hye0-log.tistory.com/44
[Jenkins]Publish over SSH 플러그인 지원 종료
최근 신규로 개발환경 세팅을 진행해야 하던 중, Jenkins에서 Publish Over SSH가 검색되지 않아 난감했던 경험이 있었다.. 왜 더이상 검색되지 않는가, Publish Over SSH를 대체할 좋은 배포 방법은 있는 것
hye0-log.tistory.com
1. (사전준비) Maven 설치하기
배포할 프로젝트는 Maven 빌드를 사용하고 있기 때문에, Maven 설치가 필요하다. 설정한 빌드 네임은 파이프라인 작성 시 필요하기 때문에 기억하고 넘어간다.
메뉴: Jenkins 관리 > Global Tool Configuration > Maven > Maven installations

2. (사전준비) Pipeline Plugin 다운로드하기
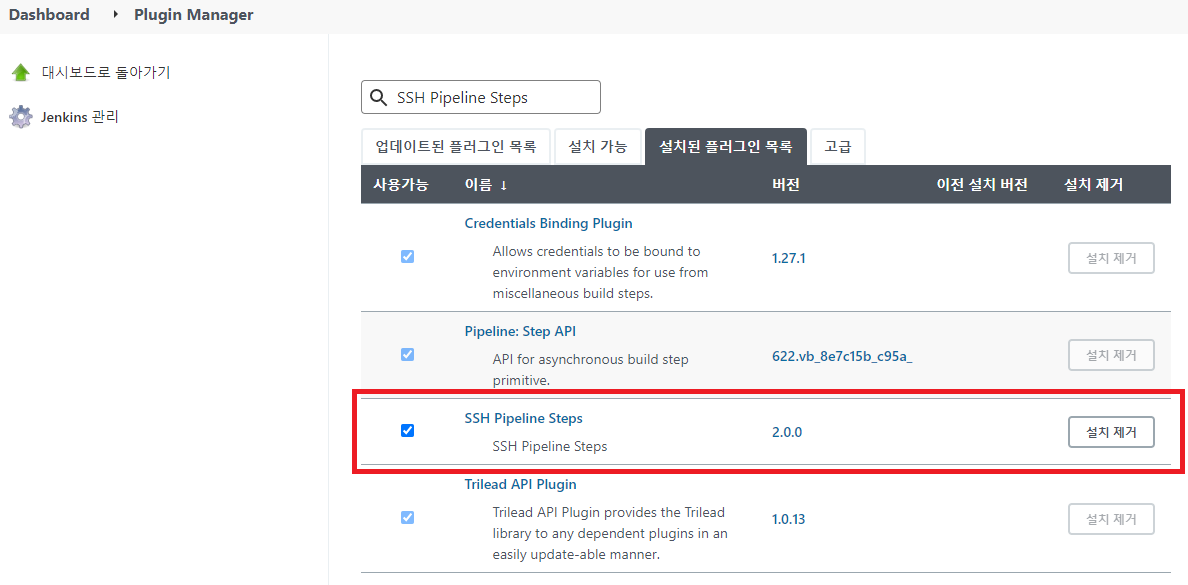
파이프라인을 이용하여 SSH접속을 해야 하기 때문에 ‘ssh pipeline steps’ 플러그인을 설치한다.
메뉴: Jenkins 관리 > Plugin Manager > 설치 가능 탭

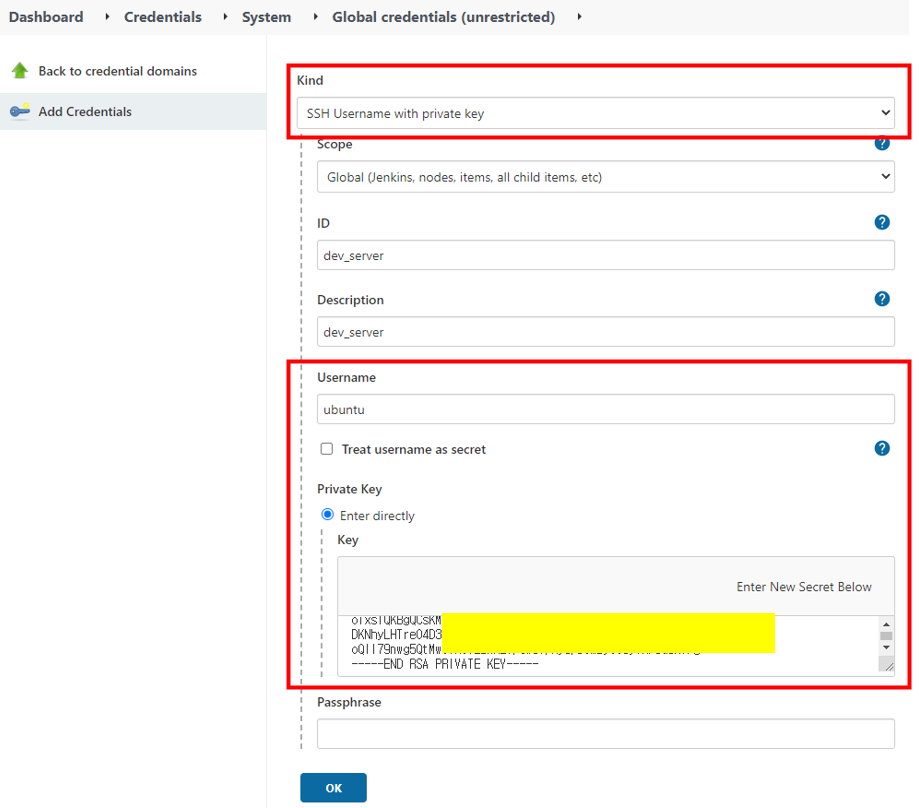
3. AWS 접속정보 추가하기 (. pem 파일 이용)
배포해야 할 서버(AWS)의 접속정보를 Credential에 추가한다.
Private Key 값은 AWS서버 생성 시 발급받은 .pem 파일의 내용을 입력하면 된다.
메뉴: Jenkins 관리 > Manage Credentials > Global credentials(unrestricted) > Add Credentials


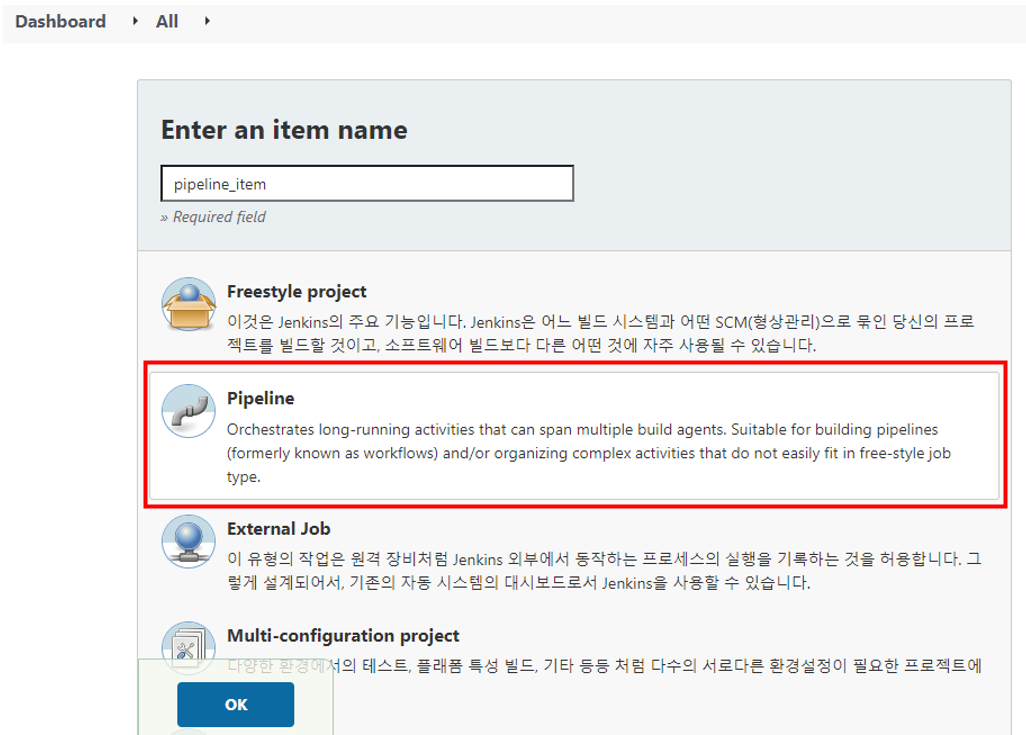
4. Item(Pipeline Project) 추가

5. Hello World Sample
아이템 구성 화면에서 Pipeline 부분으로 내려가보면 몇 가지 제안되는 Sample내용을 확인할 수 있다.
try sample Pipeline > Hello World 를 선택해서 확인해 보자.

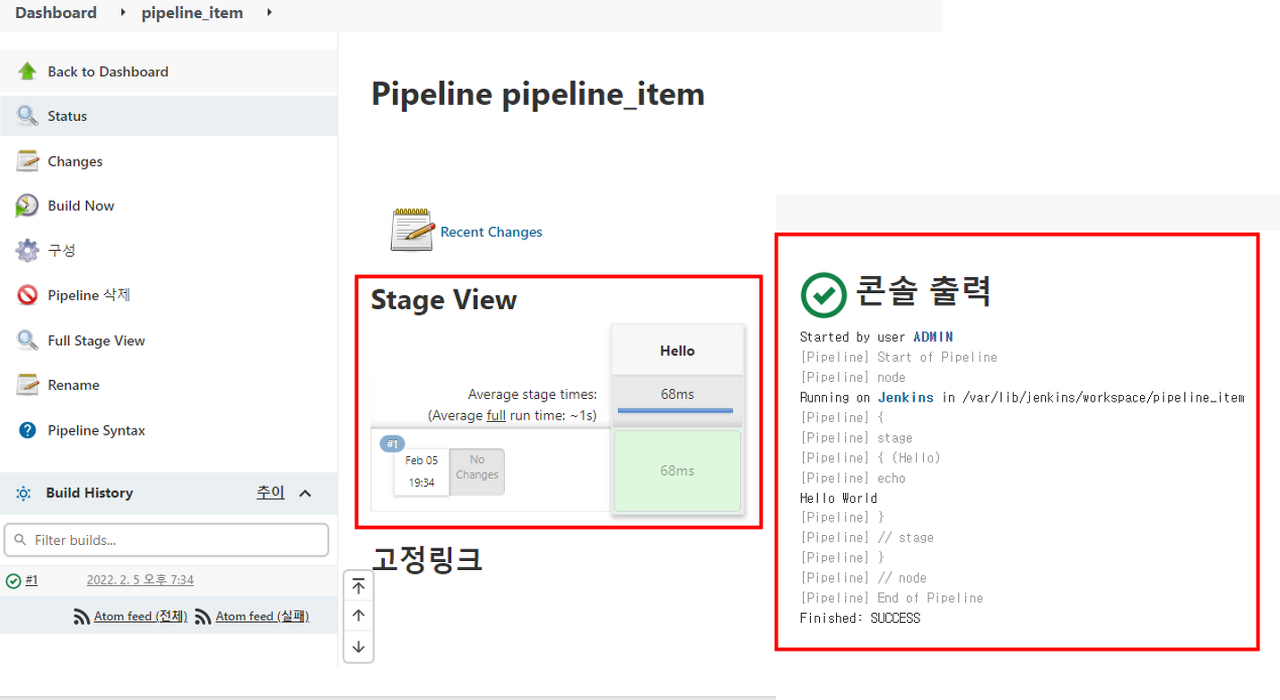
Build Now 실행
Stage View로 어느 스테이지가 몇초만에 실행되었는지를 확인할 수 있다. Build History를 보면 ‘Hello World’ 가 출력된 것도 확인할 수 있다.

6. Git + Maven Sample
기존 샘플 스크립트를 지우고 ‘Github + Maven’ 예제를 선택해본다.
Git 소스를 받아와 Maven package 하는 부분만 남기도록 수정 후 빌드해 보도록 한다.
초기 스크립트
pipeline {
    agent any

    tools {
        // Install the Maven version configured as "M3" and add it to the path.
        maven "M3"
    }

    stages {
        stage('Build') {
            steps {
                // Get some code from a GitHub repository
                git '<https://github.com/jglick/simple-maven-project-with-tests.git>'

                // Run Maven on a Unix agent.
                sh "mvn -Dmaven.test.failure.ignore=true clean package"

                // To run Maven on a Windows agent, use
                // bat "mvn -Dmaven.test.failure.ignore=true clean package"
            }

            post {
                // If Maven was able to run the tests, even if some of the test
                // failed, record the test results and archive the jar file.
                success {
                    junit '**/target/surefire-reports/TEST-*.xml'
                    archiveArtifacts 'target/*.jar'
                }
            }
        }
    }
}
수정 스크립트
pipeline {
    agent any

    tools {
        // 설치된 Maven의 이름
        maven "maven"
    }

    stages {
        stage('Git Pull') {
            steps {
                // Get some code from a GitLab repository
                git credentialsId: 'jenkins_deloy', url: 'http://[GitLab주소]/[그룹명]/[프로젝트명].git'

            }
        }
        stage('Build') {
            steps {
                // Run Maven on a Unix agent.
                sh "mvn -Dmaven.test.failure.ignore=true clean package"

            }
        }
    }
}
Stage View (빌드 성공 화면)

7. Server 접속 및 배포 Script 작성
미리 추가해 둔 Credential을 이용해 서버 접속 및 배포 진행하는 스크립트를 작성한다.
node {
    withCredentials([sshUserPrivateKey(credentialsId: '[Credential 이름]', keyFileVariable: 'identity', passphraseVariable: 'passphrase', usernameVariable: 'userName')]) {
        def remote = [:]
        remote.name = "[Credential 이름]"
        remote.host = "[AWS Host 주소]"
        remote.allowAnyHosts = true
        remote.user = userName
        remote.identityFile = identity

				// Packaging 된 war 파일 전송
        stage("Deploy") {
            sshPut remote: remote, from: 'target/[WAR파일명].war', into: '[원격지 배포 위치]'
        }
				// 서버 재시작 명령어
        stage("Restart") {
            sshCommand remote: remote, command: '[재시작 명령어 ex.service restart]'
        }
    }
}
최종 스크립트
pipeline {
    agent any

    tools {
        // 설치된 Maven의 이름
        maven "maven"
    }

    stages {
        stage('Git Pull') {
            steps {
                // Get some code from a GitLab repository
                git credentialsId: 'jenkins_deloy', url: 'http://[GitLab주소]/[그룹명]/[프로젝트명].git'

            }
        }
        stage('Build') {
            steps {
                // Run Maven on a Unix agent.
                sh "mvn -Dmaven.test.failure.ignore=true clean package"

            }
        }
    }
}

node {
    withCredentials([sshUserPrivateKey(credentialsId: '[Credential 이름]', keyFileVariable: 'identity', passphraseVariable: 'passphrase', usernameVariable: 'userName')]) {
        def remote = [:]
        remote.name = "[Credential 이름]"
        remote.host = "[AWS Host 주소]"
        remote.allowAnyHosts = true
        remote.user = userName
        remote.identityFile = identity

        stage("Deploy") {
            sshPut remote: remote, from: 'target/[WAR파일명].war', into: '[원격지 배포 위치]'
        }
        stage("Restart") {
            sshCommand remote: remote, command: '[재시작 명령어 ex.service restart]'
        }
    }
}
Stage View (빌드 실행 결과)

프로젝트 배포 완료!!
'GIT & Jenkins' 카테고리의 다른 글
| [Gitlab]Server 용량부족 확인 (feat. yum clean all) (0) | 2022.02.17 |
|---|---|
| [Jenkins]Publish over SSH 플러그인 지원 종료 (2) | 2022.02.04 |
| [Jenkins]Spring Project 배포하기 (Publish over SSH) (0) | 2022.02.04 |
| [Jenkins]원하는 파일만 골라내서 배포하기(Java Dynamic Web Project) (1) | 2022.02.03 |
| [CI/CD환경구축-3]Jenkins 초기 설정(계정 추가, GitLab연동) (0) | 2022.02.03 |


